Practical Tips For Potters Making Improved Cooking Stoves,
Part 7-- Drying and Firing the Stove
Richard Boyt, July 2005
|
|
The following material is the seventh and final part of a condensation from the booklet "Practical Tips for Potters, Making Improved Cooking Stoves".
Prepared by Tim Jones, illustrated by Debbie Riviere, published by Hofman Systems Engineering b.v., PO Box 624, 3100 AP Schiedam, The Netherlands (1993)
Improved cooking stoves and liners are usually much thicker than cooking pots that rural potters usually make. Most of the clay's 10% or more shrinkage takes place during drying, and if the stove dries unevenly, stresses are set up within the stove. If the stress is too great, sooner or later, cracks will form. It is therefore important to dry clay stoves as slowly and evenly as possible. Newly made stoves should be kept out of drafts and sunlight. The stoves need to be turned at regular intervals throughout the drying period which may last for several days (weeks?). They may be placed in a closed area where wet sacks are hung up to provide a moist atmosphere.
Firing the stoves and stove liners needs to be done slowly, particularly during the first part of the firing cycle. Initial temperature should be kept at or below the boiling point of water to allow any water remaining in the clay to evaporate slowly. If this stage goes too fast, moisture held in the center of thick clay sections becomes steam which may build up enough pressure to break the stove apart. Smoldering waste biomass, such as sawdust and rice husks, is ideal for heating during this period.
One of the benefits of improved cooking stoves is that they save fuel by being quite efficient. Starting the kiln firing with slow burning waste materials saves wood that then may be used to obtain and hold the top temperatures to finish firing the clay stoves. A balance has to be found where the stove is fired at the lowest temperature possible, yet still make it strong enough to withstand transportation and daily use. The lower temperature means less vitrification (melting and glass forming) which results in a softer and more porous stove. This in turn is better at withstanding the heat shock conditions of a fire used to cook food.
Once 100 degrees Centigrade (212F) has been slowly passed, the firing can go more rapidly up through 600 (1,112F) to 700 degrees C (1,292F)where the water held in the clay crystal structure is removed. At this temperature, the clay glows with a strong red-hot color, and the clay has changed irreversibly to pottery. At 800 degrees C (1472F), vitrification begins where ingredients in the clay begin to melt and stick together to form a strong, brittle material. Most clay stoves are kiln fired to between 750C (1380F) and 850C (1562F). The top temperature should be held for at least one hour, and then slowly cooled down.
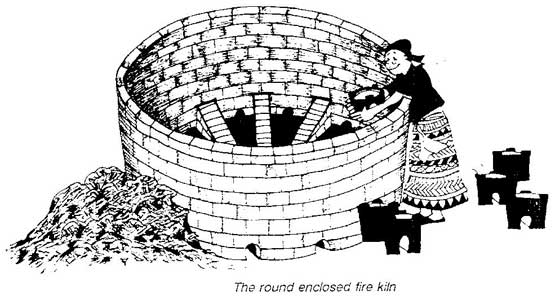
Kilns are furnaces that can control the high temperatures at which they are fired. They exist in all shapes, sizes, costs, and capabilities. The round enclosed fire kiln is relatively inexpensive to build, but not easy to control as once the fire is started no more fuel can be added. The kilns consist of a circular wall enclosing a raised floor which is arranged like the spokes of a wheel. The kiln is loaded with wood between the spokes.
The stoves to be fired are placed on top of the spokes, and then the kiln is filled with sawdust and other combustible materials. The top of the kiln is covered over with a t hick layer of grass or straw and then a layer of mud, broken pot shards, and metal sheets. Air holes along the sides of the kiln can be opened or closed during the firing to control the heat within the kiln.
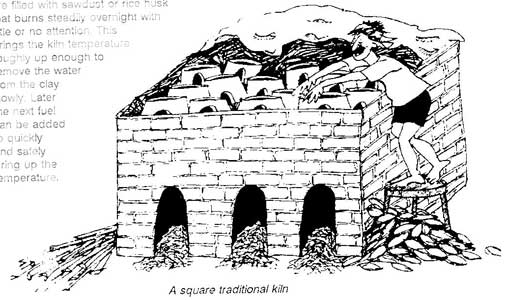
Another common kiln design is a square traditional kiln. It is relatively easy to build and fire because of its square shape. The floor consists of short brick pillars that the stoves are placed upon so that they bridge the spaces between the pillars. The heat flows between the pillars under and up through the stoves. Stoked coals at the sides of the kiln permit the addition of fuel as needed during the firing period. As with the round enclosed fire kiln, the top is covered with layers of straw, mud, pot shards, and sheet metal.
Many other kiln designs may be built, including bottle shape, and catenary arch kilns. They are more efficient and can reach higher temperatures, but are more costly and complicated to build and operate.
------
My reactions to the above quotations from the booklet "Tips for Potters".
I confess that I have taken some liberties in modifying the text in order to clarify it. This part 7 is the last. Caution should be used by firing the kiln slowly through the temperatures around 573 degrees C (1060F), when there is a sudden 2% expansion of the silica. This expansion is reversed as the temperature falls back below 573 C. Rhodes writes that chemically held water leaves the clay at from 350 C (660 F) to 500 C (932 F). After that temperature has been achieved, the clay will no longer slake and break down in water. The clay does not shrink during this dehydration but becomes very fragile. The enclosed attachments contain drawings by Debbie Reviere for the "Practical Tips for Potters" booklet.
Practical Tips for Potters, Parts 1, 2, 3, and 4 may be found in the Stoves Participants Archives of Richard Boyt. Additional useful information on drying and firing the stove may be found in the Participants Archives of Christa Roth of IFFP, "How to Construct a Kiln for Clay Stove Firing", Don O'Neal of HELPS International (several entries), Dean Still, Ken Goyer, Damen Ogle, and Peter Scott all of Approvecho (many entries), Richard Boyt "Ceramics for Cook stoves" Parts 3a through 5a. Also see "Fired Clay Stove Production" (p.78) in Biomass Stoves" by Sam Baldwin, 1987.
Hope this proves useful
Dick Boyt
Dick Boyt
rdboyt@yahoo.com
20479 Panda
Neosho, MO 64850
(417) 451-1728
Note: See other articles by Richard Boyt